Discussion Group Guide
Thank you for choosing Net Atlantic for your discussion group hosting. This document provides instructions to get you started quickly.
Table of Contents
- Logging Into Your List
- Adding Subscribers
- Sending a Message to Your List by Email
- Sending a Message to Your List With the Control Panel
- Changing Discussion List Settings
- Creating a Subscribe Form for Your Web Site
- Using the Built-in Web Page Subscribe Form
- Changing Your List Welcome Message
- Using Passwords to Prevent Messages Going to Your List
- Allowing Access to Your List by Control Panel
- Adding an Additional List Administrator
- Optional Add on Service: Virtual Mail Server (list.yourdomain.com)
- Backing up Your Subscriber List
- Having a Member List Emailed to You
- Resources for Discussion List Users
- Getting Additional Assistance
1. Logging Into Your List
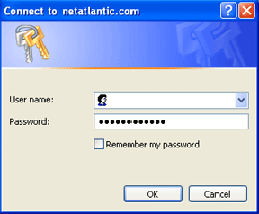
- Open a Web browser and navigate to https://www.netatlantic.com/login.php.
- Enter your username and password as shown below; password is case sensitive:
Username: ##ADMINEMAIL##
Password: ##ADMINPASS##
Listname: ##LISTNAME##

Please refer to your listname, ##LISTNAME##, when contacting Net Atlantic Support.
2. Adding Subscribers
There are several different ways to add subscribers to your list. The easiest way is to log in to your control panel and paste in your subscribers, as explained below.
Note: The server automatically checks for duplicate email addresses. There will never be two of the same email address on the list at the same time.
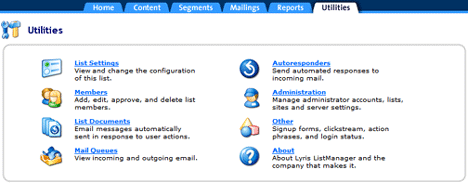
- Click Utilities tab.
- Click Members.
- Choose Create Many Members from the drop down menu.

- Paste or type email addresses in the Email addresses text area.
Note: Each address needs to be on a separate line. - Click Save.
3. Sending a Message to Your List by Email
For most discussion lists, subscribers simply send an email message to the list address on the mail server, and then the server sends the message to everyone on the list. The default setting is that any subscriber on your mailing list can send a message to the list (and everyone on it).
Here's how to send to your list by email:
- Compose an email message in any email program.
Note: Your message can be plain or formatted text, HTML or have an attachment. - Send your email to: ##LISTNAME##@##VIRTSERVER##.
- Your message will then be accepted or rejected
- Accepted - Your message will be immediately sent to all members on your list, including the list administrator.
- Rejected - Your message will be returned to you. A description of why your message was
rejected will be included; this will help you determine how to successfully resend the message.
Note: Your message could be rejected if it is being sent from an email address that is not a member of the list. Alternatively, if your list is password protected, another reason could be that the password was not included in the email.
4. Sending a Message to Your List With the Control Panel
Less commonly used for discussion lists, you can send a message to your list using the Web-based control panel. One reason to use the control panel would be if you want to send an HTML email to your list. Here's how:
- Click Mailings tab.
- Select New Mailing.
- Mailing name, From and To fields are automatically filled.
- If needed, you can change the Mailing name.
- We recommend: "Your Company Name" <youremail@yourcompany.com> for the From field.
- Do not change the To field.
- Choose a subject line and type it into the Subject text area.
Note: For better open rates, it is a best practice to use short, direct subject lines. - You are now ready to type in your message using HTML, plain text or both. We advise sending both HTML and text messages. Recipients who can see HTML will only see the HTML version of the message. Those who cannot read HTML emails will receive your email in plain text format.
- HTML - Paste or type your HTML message in the HTML message field. Here you can customize your message by changing fonts, font sizes and text colors, and by adding emphasis with bold, italic, bullets, hyperlinks, etc. It is a best practice to only underline links within your text.
- Plain Text - Paste or type the plain text version of your message in the Text message field
- Click Save and Test
- Enter the email address to which you want to send the test email. You can send the test to multiple email addresses by separating each address with a comma. Click OK.
- Once you are satisfied with your test message and are ready to send your mailing, click the Send Now link located in the same row as the message you want to send.
- After clicking Send Now, you will be brought to a page asking you to confirm that you are ready to send your mailing. Click OK to send or click Cancel. Once you choose OK, a message displays briefly on your screen informing you that your mailing will now be sent.
WARNING: Do not click "SEND ALL" unless you want to send all of the messages in the "Need Approval" section to your list.
Note: If you have saved and tested more than once, you will see multiple tests in your approval queue. Choose your mailing carefully before you hit send. It is advised that you delete old versions.
5. Changing Discussion List Settings
Your mailing list has been set up with the most popular features, options and settings. Your list settings can be changed, but care should be taken when making any changes.
To change your list settings:
- Click on the Utilities tab.
- Choose List Settings.
- From there you can access New Subscriber Policy, Email Submitted Content, and other Discussion Group Features.
Here are a few of the many configurable settings:
- List Moderation - Approve or deny messages posted to the list. Default setting is no moderation; all messages get sent out to all subscribers.
- New Member Approval - Approve or deny list join requests. Default setting is open; no approval needed to join list.
- Message Replies to Sender or Entire List - Replies to messages are sent to either the sender of the message only or to the entire list. Default setting is that message replies are sent to the entire list.
- Password Protection - Require all list members to have a password in order to post to the list. Default setting is no password required.
- Append subject lines with your list name in brackets or other identifying label - Default is to append email subject lines to begin with: [##LISTNAME##].
- List Security - Allow only administrators, only members, or anyone to post to your list. Default setting is only allow list members to post to the list.
- Banning Members - Not allowing certain email addresses to join your list. Default setting is that no email address is banned.
- Maximum Number of Messages Sent to the List in 24 Hour Period - Default setting is no limit.
- Maximum Message Size - Allows maximum message sizes to be set. Default setting is no maximum.
- Maximum Message Posts per Member - Prevent someone from dominating the list discussion. Default setting is no maximum.
6. Creating a Subscribe Form for Your Web Site
Get new subscribers to join your mailing list by adding a "Join Our Mailing List" form on your Web site:
- Click Utilities tab.
- Select Other.
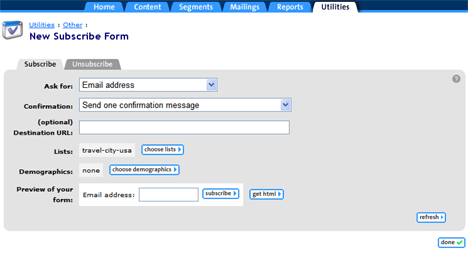
- Choose Subscribe Forms which will bring you to the form creation page.
- Select the desired options for your join form.
- Ask For drop down - Choose Email or Email Address and Optional Name.
- Choose if you want a confirmation and/or a Hello message sent from the Confirmation drop down.
- It is recommended that you direct the subscriber to a "Thank You" page on your Web site after they complete the form; in the Optional URL Destination type the "Thank You" page URL.
- Complete the desired options and preview your form.

- Once you are satisfied with the subscribe form they way you want it, click Get HTML
- Copy the HTML and paste it into your Web site.
- At this point you can alter the titles of the fields so they don't say "field_1_."
- For example: <font size=1>field_1_: </font> can be changed to <font size=1>Favorite Food: </font>
You now have a subscribe form on your Web site. Sit back and watch your list grow!
7. Using the Built-in Web Page Subscribe Form
Use the below link on your Web site to allow people to easily join your list. The link sent in your welcome email will direct your potential subscribers to a pre-built Web page form. You can also use this form to easily add new subscribers to your list, one at a time.
8. Changing Your List Welcome Message
When a new subscriber joins your mailing list, they will receive your welcome message (hello document) by default. Here is how to edit the default welcome message:
- Click Utilities tab
- Choose List Documents
- Click on an existing document link to edit it or click create new document.
- Add or edit the essential information, name, subject and body.
- Click Save

Note: In addition to a list welcome message, you can create a list goodbye message, confirmation message, help message, autoresponder message, and more. Click the Advanced tab and change the Document type.
9. Passwords Prevent Messages Going to Your List
If you use password protection for your list, you must include your password in the body of your email message. If using password protection, most people put the password in as the last line of the email message. This password will be automatically removed by the server once verified. If the password cannot be verified by the server the message will be rejected.
10. Allowing Access to Your List by Control Panel
Although many discussion list users prefer to communicate entirely by email, you can provide your subscribers with control panel access to manage their subscriptions, set digest mode, vacation mode, send messages, unsubscribe, and more. To do this:
- Direct your subscribers to: http://##LONGNAME####6PORT##/read/all_forums/?forum=##LISTNAME##.
- After login:
- Subscribers and the list administrator will have access to the following tabs:
- Messages - Access prior messages, reply to messages, or create new messages.
- Search - Find specific text in posted messages.
- My Account - Change your subscriber settings here.
- My Forums and All Forums - Access lists that you belong to from here.
- List Administrator will also have access to the About tab which includes the following statistics:
- Current members that are on your list
- Number of messages for current day
- Total messages in the past 7 days, 30 days and overall
11. Adding an Additional List Administrator
Additional administrators can be added, allowing you to share responsibilities such as; approval of new subscriber requests, adding banned members, moderation of messages posted to the list, and list setting changes.
Add additional list administrators:
- Click Utilities tab.
- Select Administration.
- Choose Administrators.
- Click List Administrators.
- Click Create New Administrator on the right.
- Type in their email address, name and password.
- Click on the Advanced settings tab.
- Choose "No, never put this member on hold" from the Hold User drop down menu.
- Click Save.
Edit list administrator settings:
- Click Utilities tab.
- Select Administration.
- Click Administrators.
- Select List Administrators.
- Choose the List Administrator address you want to edit.
- Make your edits.
- Click Save.
12. Optional Service: Virtual Mail Server Information
(Example: list.yourdomain.com)
A virtual mail server allows you to use a name such as "list.yourdomain.com" as the address of your mail server. This Web address appears in various places in your email messages including the header and unsubscribe footer. This helps further brand your company name and makes it appear that you have your own mailing list server. If you do not choose the virtual mail server option, your address will default to something like list.netatlantic.com.
Net Atlantic can set up a virtual server name for you, there is a $29 one-time fee. For more information email support@netatlantic.com.
Once your domain registrar or Web hosting company has set up your C-Name (virtual server name), it will start working in about 12-18 hours, as it propagates throughout the Internet. Until it is operational, you can always substitute list.yourdomain.com with ##LONGNAME##, such as in
http://##LONGNAME####6PORT##
or
http://##LONGNAME####5PORT##/cgi-bin/lyris.pl?site=##SITENAME##&page=admin
13. Backing up Your Subscriber List
We recommend that you back up your subscriber list every 30 days.
- Click Utilities tab.
- Select Members.
- Click on the Floppy Disk icon, located on the right below "create new member".
- Another page will display; click Save.
- A File Download box will appear; choose Save.
- Choose a location on your computer to save the file.
- Type in a File name.
- Click Save.
14. Having a Member List Emailed to You
To have your member list emailed to you, just follow these instructions:
- Compose a new message in any email program
Note: Message must be sent from ##ADMINNAME## <##ADMINEMAIL##> - Subject line must be blank
- In the body of the email include the following;
login ##ADMINPASS##
review ##LISTNAME## - Send the email message to lyris@##VIRTSERVER##
- The reply email will contain a list of all your active list members.
Note: You can also get a member list with additional information and/or for members in held or unsubscribe status. Replace the command in step 1b with one of the following:
- review ##LISTNAME## all - all member types
- review ##LISTNAME## names - email addresses and names only
- review ##LISTNAME## full - email addresses, names and other information
- review ##LISTNAME## held - members who are in hold status
- review ##LISTNAME## unsub - members who have unsubscribed
15. Resources for Discussion List Users
Discussion list administrators may want to review some of these guides and resources:
The Natural Life Cycle of A Discussion Mailing List
Discussion Group Etiquette and FAQs
16. Getting Additional Assistance
- View the Lyris ListManager online user manual.
- Call Net Atlantic Support at 978-219-1900,
Monday – Friday, 7:30 a.m. to 7:00 p.m., EST - Email support@netatlantic.com
- Use Net Atlantic's Live Support chat.
Book A Call With One of Our Experts
Fill out this form and one of our email specialists will contact you about how we can help you
achieve even greater engagement by switching to Net Atlantic for email marketing services.


