
User's Guide
This User's Guide contains instructions and information on how to use advanced features of your service. For a quick introduction on basic features of our email marketing solution review our Easy Start Guide.
Table of Contents
- Logging Into Your List
- Understanding Subscriber Status
- Creating a .CSV File of Your Subscribers
- Adding Subscribers to Your List by .CSV Import
- How to Send a Mailing to Your List
- Creating a Segment
- Sending Mail to a Specific Segment
- Mail Merging Your Data Into a Mailing
- Creating and Using a Survey
- Enterprise Level: Performing an A/B/n Split Test
- Understanding Tracking Statistics
- Changing Your Welcome Message
- Optional Add on Service: Virtual Mail Server Information
- Sending a Message to Your List by Email
- Backing Up Your Subscriber List
- Getting Additional Assistance
1. Logging Into Your List
- Using your web browser go to the Login Page.
- Enter your username and password as shown below, password is case sensitive:
2. Understanding Subscriber Status
The subscribers on your mailing list are managed automatically by the email server. When adding new subscribers to your mailing list, they are initially set as normal subscribers. Here are some additional definitions that describe the status of your subscribers.
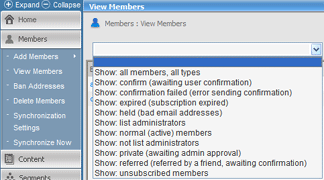
- Confirm Have been sent a confirmation message but have yet to confirm
- Confirmation Failed Were sent a confirmation message that did not go through (bounced)
- Expired Were sent a confirmation message and did not confirm before the expiring date
- Held Have bounced a number of messages in the past 30 days
Note: The number of bounced messages before someone is set as a held member can be viewed by clicking Utilities -> List Settings -> Automatic Maintenance. If someone cannot be sent to this number of times, they are automatically set as held. It is important to keep this number low to help filter out email addresses that have gone bad. - List Administrators Any user that has been set as an administrator
- Normal (active) All users that receive mail when sent
- Not List Administrators All members that are not set as administrator
- Private Members waiting for approval to join list - only active if list is set as private
- Referred Have been referred by a normal member and are waiting for confirmation
- Unsubscribed Any member who has unsubscribed from the list
To view different types of members:
- Click Members
- View Members
- Choose the member type you want to view from the drop down menu.
3. Creating a .CSV File of Your Subscribers
There are many different ways to add your subscribers to your list.
Probably the easiest way to add your subscribers is to simply log in to your control panel, choose Members, Add Members, Add Many Members. From this page you can simply paste in your subscribers in the box, and click Save.
To Import Subscribers do the following:
If you have many subscribers to add to your list or you also desire to include various demographic information with field values such as Client, Prospect, ZipCode, State, AreaCode, ItemBought, AmountPurchased, Paid, FreeTrial, ExpireDate, Gender, MaritalStatus, Birthday, etc. the best way to do this is by creating and importing the data from a .CSV file (comma separated value). One reason to do this is so that you can subsequently query on this information to create different segments that you can send mail to. Another reason is so that you can perform a mail merge with this information in order to automatically insert these values into your email messages.
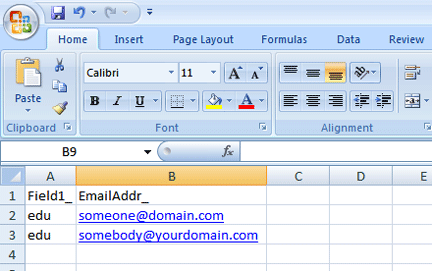
- Create a .csv file
Note:To create a .csv file it is best to use Microsoft Excel or a similar program. When saving an Excel file, your file must be saved as a .csv. To do this click File and Save As. Choose CSV (comma delimited) *csv. from the Save As Type drop down menu located at the bottom of the window, then click Save - In row 1 enter the custom fields you would like to use, see How to Create a Segment for a list of available fields
- In the columns available, add any information that you would like to segment by
Download these example Excel files to help you create your own.
Professional Level Sample CSV File(includes 6 extra fields)
Enterprise Level Sample CSV File (includes 35 extra fields)
Note: Remember to follow instructions above to convert file to .csv format. Do not change the values in Row 1, these values are necessary to import your subscriber information.
4. Adding Subscribers to Your List by .CSV Import
Once your .csv file is ready, you can import your subscriber information to the mail server. While logged into the Net Atlantic control panel:
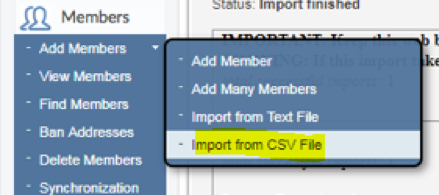
- Click on Members
- Mouse over Add Members to open the dropdown menu
- Choose Import from CSV File
- If not already selected, choose Import quietly as regular members (no hello or confim message will be emailed to your subscribers)
Optional: Select Use types setting in CSV file, in the Action section if import contains MemberType_. - For Update existing members? No is the preferred setting. : Choose Yes only if you are updating information for members already in your list. If these are new email addresses you can select "no".
- Terminate Import, Choose the dropdown "Do not terminate import due to malformed addresses".
- Click on Browse and locate the .csv file you created on your computer (such as My Documents)
- Click Next where you will be brought to the Mapping Fields section
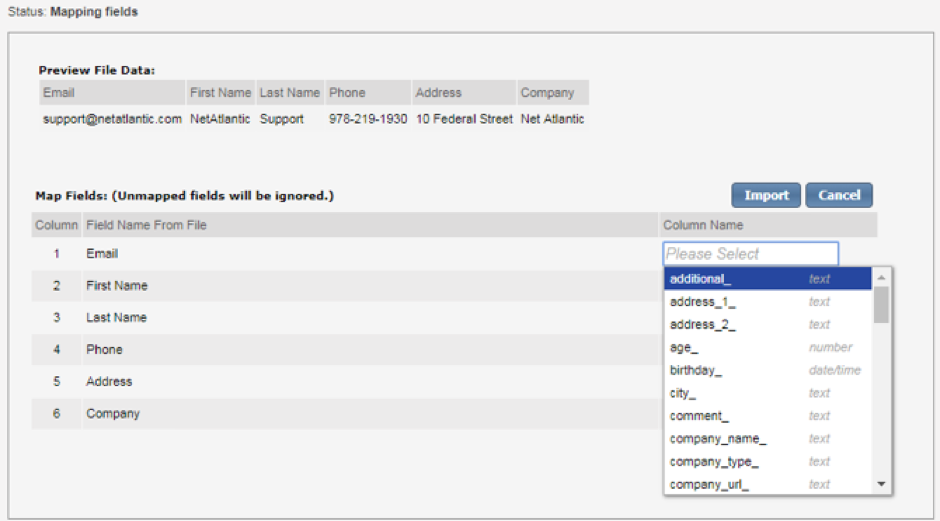
- Here you can click in the Column Name section where you will select the corresponding field for each column on the imported file.
- Once you have completed your field mapping as shown above you will then click on Import to complete the process.
If you know the Column name you would like to map to, you can start typing the name and are displayed a list of matching fields for you to select from.
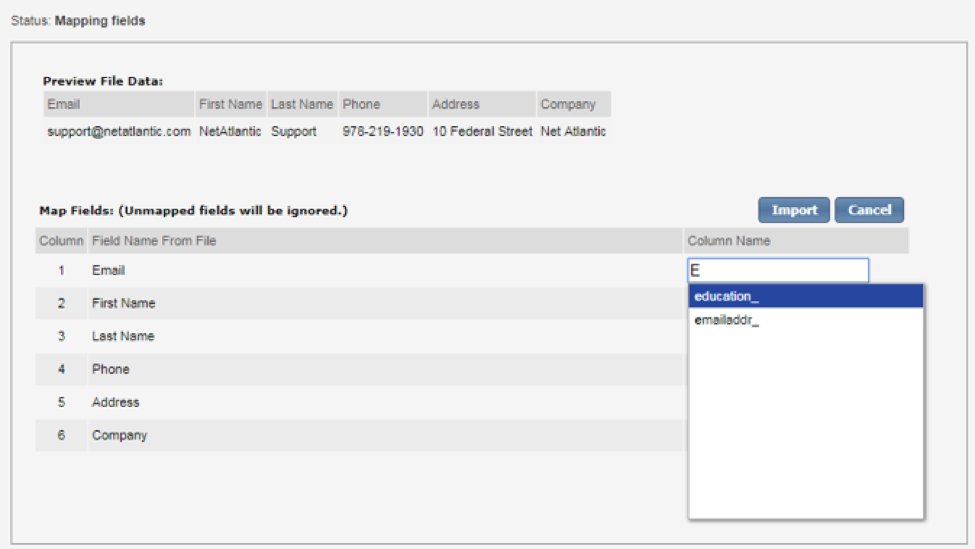
Completed Field Mapping shown below:

5. How to Send a Mailing to Your List
- Click on Content button for drop down menu.
- Choose New Content.
- Enter your Content name, and content Description.
- From: By default, your email address will appear here. Check to make sure it is correct (do not use gmail, outlook, aol, or other similar email address for your From email address). You must use your domain name, such as newsletter@yourcompany.com A good format to use is: "Your Company Name" <youremail@yourcompany.com>
- The To field is automatically filled in with each recipient on your mailing list. Every recipient gets their unique email addressed to them. [Do not change the To: field].
- Type in your email Subject line. Recipients will see this line as the subject of the email they receive. It is a best practice to use short, direct subject lines as more people will open your email
- Click the HTML tab.
- If you need to create your content from scratch, choose Responsive Editor.
- If you have your HTML content ready to use, choose the HTML Source Editor.
Note: If you want to design your newsletter in Dreamweaver or another Web design program, use the HTML Source Editor to paste in your own HTML. (We do not recommend creating HTML with MS Word, Excel, Publisher, or PowerPoint) Even if these or other programs offer a “save file as HTML” option, the HTML created is a non-standard format that may not work with many email clients.
Plain Text - This is where you can type in a plain text message. This ensures that those who cannot read HTML emails will receive your email in plain text format. - Depending on which option you choose, create your content and click Save.
- For best delivery, after your content is created, click the Text Message tab, and then click the Html to Text button to create a text version of your newsletter. This will be display only for subscribers who only read text versions of email.
- Once your content is created and saved, click Preview to see how your content will look when sent. If needed, click Edit to make any changes.
- When ready, choose Create Mailing
- Click on Schedule tab to schedule your mailing, or leave Wait for Approval as the default selected option (you will approve this in a moment).
- Click Save and Test
- Your email address will appear as a default. You can add in additional email address to send to by typing in one or more email addresses, separated by a comma.(Example: email1@domain.com,email2@domain.com,email3@domain.com) Then click Ok button.
- Message will appear that Test Sent. click OK
- Check your email account(s) to make sure you get your test message(s), and that everything looks okay.
- If your message was scheduled for a date in the future, it will be sent automatically at that date and time.
- Need Approval - Once you are satisfied with your test message and are ready to send your mailing, click the Send link located in the same row as the message you want to send. After clicking Send, you will be brought to a page asking you to confirm that you are ready to send your mailing. Click OK to send or click Cancel. Once you choose OK, a message displays briefly on your screen informing you that your mailing will now be sent. Your message will be sent immediately, and quickly.
- Note: If you have saved and tested more than once, you will see multiple test mailings in your approval queue. Choose your mailing carefully before you hit send. It is advised that you delete old test mailings from the queue to avoid confusion.
6. Creating a Segment
Segments are very useful for creating subsets of your list that you can mail to. For example, you can send email to subscribers who have opened an email, clicked on a link, not opened an email, are a prospect, are from a certain state or zip code range, and more.
Please note that there are several preinstalled helpful segments already created for you. These pre-built segments include, as examples:
joined-last-month
joined-last-year
not-opened-last-90-days
email-addresses-that-begin-with-a-to-e
slice-the-first-tenth-of-your-list
and many more.
If you need to create a custom segment, here's how to begin:
- Click Segments
- Click on Create new segment in the upper-right corner
- Under the Essentials tab, give a name and description for the segment
- Segment names must be lowercase and cannot contain space
- Click Insert Clause
- Choose how you want to identify the segment from theIf member text field drop down menu
- Professional subscribers can use the custom fields "Additional_," "FullName_," "Comment_," "UserID_," "Field_1_," "Field_2_" and "Field_3_"
- Enterprise subscribers see Additional Available Fields listed on the Demographic Segmentation Features page.
- Select contains from the Is: drop down
- Type the segment criteria in the This value: field, this value must match your .csv file criteria
- Check off the Match case box
- Click Insert, you will now see the finished segment
- Click Save and the segment is complete
- If you already have subscribers meeting this criteria, you can click Save and Test to show members in this segment
7. Sending Mail to a Specific Segment
- Click Content, View Content, Create Mailing
- or click New Mailing
- Select the Recipients tab
- Click Choose Segments in the Segments: section
- In the Chosen Segments box on the right the entire list is selected as a default. Click on that segment to highlight it and click << to remove it
- Choose the segment that you created and click >> to move it to the Chosen Segments box
- You can select as many segments as you would like
- Click OK
- Finish creating your message and send your mail
8. Mail Merging Your Data Into a Mailing
Once you have uploaded members with data in the custom fields, you can merge that information into your messages to send relevant and personal emails. You can merge multiple data fields into subject lines, body copy, footers, and more.
To perform a mail merge you simply enclose the custom field name with percent signs, for example%%field_1_%%
When using the name field you can use %%FullName_%% or pull just the first name from the field using %%firstname%%.
For example:
Dear %%firstname%%,
Thank you for letting us know that %%field_1_%% is your favorite food. Once again %%FullName_%%, we appreciate your business.
- Your Neighborhood Supermarket
Would look like this after the mail merge:
Dear John,
Thank you for letting us know that ice cream is your favorite food. Once again John Doe, we appreciate your business.
- Your Neighborhood Supermarket>
9. Creating and Using a Survey
Survey features, available on all service levels, can be used to gather feedback from your subscribers. Members who answer a survey, regardless of how much they finish, can be segmented and mailed to thanking them for their feedback.
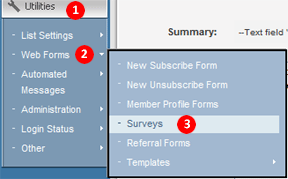
- Click Utilities
- Mouse over Web Forms
- Select Surveys
- Click Create New in the upper-right corner
- Type a unique survey name in the Internal survey name: field
- Type the title of the survey in the Survey name to display:, subscribers will see this title
- Click Advanced tab for additional options such as:
- a destination Web page members will see after taking the survey
- whether updated survey results should be displayed upon taking the survey
- controls preventing multiple survey entries by a member or household
- After making your selections click Basics tab to begin entering your survey questions
- Click Add next to Questions to ask:, to begin adding questions to your survey
Adding a Question to Your Survey:
- Select the answer format you want subscribers to use, Multiple Choice or Text Entry
- Type the question in the One-line description: field, i.e. "What is your favorite color"
- If you are using multiple choice for your answer format the following applies:
- Put the answer choices in the Multiple choices, one per line: box, each answer on a separate line
- Select how many options the subscriber can choose in the How many answers?: drop down
- Choose if you want the answers to be displayed horizontally, vertically or in a drop down menu by making a selection in the Question orientation: drop down
- Type additional text you want to add to the question in the Optional Help Text: box
- Select if you want the answer to this question to be mandatory in the Answer required?: drop down
- Click Add once this section is complete
Finishing Your Survey:
- Click Preview to see your survey
- Click Save
- You will be taken to a page with a link to your new survey and instructions for adding it to your email
- At this point the survey is ready to be inserted into your email, Web page or edited to match the design of your site/organization
- To insert this survey into email content, click the Content tab and select View Content
- Click on Create new on the upper right side of the screen
- Fill in the subject, description, and name of your content, then click the HTML Message tab
- Click Insert URL
- Select the Survey tab
- Use the drop down menu to choose the survey you have just created
- You can customize the clickable text to attract survey takers
- Select Track Survey, yes or no
- Click Insert
- The link to the survey is placed at the end of the email. Copy and paste the survey link to the desired location in your content
- You may edit the look and feel of the survey by returning to Utilities, clicking Web Forms, and then Surveys
- Click on the name of the survey you just created and click Edit Source
Tracking Your Survey Results:
- To view results of the survey click the Reports tab
- Mouse over All Reports
- Select Surveys
- View your respondents' answers under Survey Results
- Click the number in the Responses column for more detailed information on the respondents email address, date, IP, and the method in which the survey answers were submitted
10. Enterprise Level: Performing an A/B/n Split Test
A/B/n split testing offers a great way to increase the success of your email campaigns, by testingsubject lines, content, merged fields, or a combination of these and more. Use split testing to send different versions of your email to a percentage of your subscriber list and track which version gets more response. Once you get your results, send the more effective version to the rest of your subscribers. This feature is only available to Enterprise Level users.
Before using A/B/n split testing, create two versions of your email message. To do this click Content, View Content and click Create New. After creating your content begin using the split testing features by:
- Clicking on Mailings
- Mouse over Advanced Mailings
- Mouse over Split Test Mailings
- Click Split Test Mailings Wizard
- Type a name for your test in the Split Test Name: field
- Type a description of the test in the Split Test Description: field
- From the Segment: drop down choose the segment of your list you would like to send to, as default all of your list is selected
- Select which Sampling Methodology: you would like to use, % of Segment or # of Members, both options will choose members at random from the segment you select
- From the Content drop down choose which mailings you wish to test
- Click View to display the selected mailing
- Click More if you wish to test additional content
- Click Next
- By default, the advanced settings are chosen for you. If needed these can be changed
- Click Next to review your settings
- Click Send
Results from your A/B/n Split Test:
It is suggested to wait a minimum of 24 hours to view results from your split test. Once you are ready to view your split test results:
- Click Mailings
- Mouse over Advanced Mailings
- Mouse over Split Test Mailings
- Select Split Test Results
- All of the statistics are displayed, for charts showing the success of tested content choose from Reports:
- Success measures the number of people who received the mail
- Opens measures the number of unique opens and total number of opens
- Clickthroughs measure the number of people who clicked on a link in the message
- Click the Send Rest link next to the message that performed best, this will send the mailing to the subscribers in the segment that did not receive a test message
11. Understanding Tracking Statistics
With Net Atlantic's reporting features there are various ways to view and analyze the performance of your mailings. Here is an example of how to access one of these reports:
Tracking Statistics Report:
- Click Reports
- Select Tracking Statistics
- A page like the example below will be displayed
- Understanding the statistics provided:
- ID - The unique ID# of the mailing
- Mailing Name - The name of the mailing designated by the system, with date and time sent
- Sent# - Total number of recipients sent to
- Open# - Number of unique opens (does not include people who opened the mail twice)
- Open% - Percentage of people who received and opened it
- CT# - Number of people who clicked on a link in the message
- CT% - Percentage of people who received the mail and clicked on a link in the message
- CS# - Number of people who were tracked by click streaming (must be setup)
- CS% - Percentage of people who received the mail and were tracked by click streaming
- Create - Date the mailing was created
12. Changing Your Welcome Message
When a new subscriber joins your mailing list by email or a subscriber form, they will receive your welcome message. To customize your welcome message follow these steps:
- Click Utilities
- Mouse Over Automated Messages
- Select Document Content
- Choose your welcome message, the document name includes "-hello"
- Edit the information in each tab: Essentials, HTML Message, Text Message, etc.
- Click Save
13. Optional Service: Virtual Mail Server Information
A virtual mail server option allows you to use a name such as list.yourdomain.com as the address of your mail server. This web address appears in various places in your email newsletters (headers, unsubscribe footer, etc.) This helps further brand your company name, and makes it appear that you have your own mailing list server. If you do not choose the virtual mail server option, your address will default to something like list.netatlantic.com.
Once your domain registrar or web hosting company has set up your C-Name (virtual server name), the virtual server name will start working in about 12-18 hours (as it propagates throughout the Internet). Until it is operational, you can always substitute list.yourdomain.com with ##LONGNAME##, such as in
http://##LONGNAME####6PORT##
or
http://##LONGNAME####5PORT##/cgi-bin/lyris.pl?site=##SITENAME##&page=admin
If you do not have a virtual server name, Net Atlantic can set one up for you, there is a $50 one-time setup fee. For more information email support@netatlantic.com.
14. Sending a Message To Your List by Email
Although most people prefer to send messages to their list by using the Web-based control panel, you can also send a message to your list simply by sending an email. Here's how:
- Compose your message in any email program. Your message can be plain text, formatted text with bold, italics, and colors, or html format, and can also contain an attachment.
- Include your password in your email message, preferably at the end of your message as the last line. This password will be automatically removed by the server once verified.
- Be sure your email is sent from: ##ADMINNAME## <##ADMINEMAIL##>
Note:This email address must match both your List Administrator name and email address exactly or it will be rejected by the server. - Send your email to: ##LISTNAME##@##VIRTSERVER##
If your message is accepted, it will be sent out immediately to all members on your list. You will also get a copy, since as the list admin you are also a member of the list. If your message is rejected and returned to you, the mail server will include a description of why your message was rejected. This will help you determine what you need to do to successfully send a message to your list.
The server checks for three important parts of your email before sending:
- the message includes the password in the body of the message
- the list admin is a member of the list
- your message is sent from the List Admin with the exact same spelling of both your name: ##ADMINNAME## and your admin email address: <##ADMINEMAIL##>
15. Backing Up Your Subscriber List
- Click Members
- Select View Members
- Click the Excel icon in the upper-right corner
- A confirmation page will appear, click Save
- A File Download box will appear asking you if you want to Save, Open or Cancel
- Select Save
- Choose the location on the computer and name you want to call your file
- Click Save
16. Getting Additional Assistance
- View the Easy Start Guide
- View the Lyris ListManager online user manual
- Call Net Atlantic Support at 978-219-1900
- Email support@netatlantic.com
- Use Net Atlantic's Live Support chat
Book A Call With One of Our Experts
Fill out this form and one of our email specialists will contact you about how we can help you
achieve even greater engagement by switching to Net Atlantic for email marketing services.